Showing posts with label Wreath Tutorial. Show all posts

Sunday, July 15, 2012

Weekend Pajama Party: Tulle Rose Wreath Tutorial

Last week I showed you the Sugar & Spice themed baby shower I threw for my friend Katie. 
{Click HERE if you want to check it out!} 
This wreath was a cotton candy inspired creation that was super easy to make for her sugar infused theme!  I based it off a similar wreath I found here

Here's what I used to make it:
*12 inch Styrofoam wreath base
*Corsage pins - make sure you get long ones!
*11 yards of pink tulle
{The best part of this project was that I realized when you tell a guy you're going to buy tulle, they get all excited and start talking about drills and power saws...and then they get depressed when they realize you aren't talking about power tools.} :)

I wrapped the wreath in some extra fabric so the finished product would look really clean. 
{Plus I wasn't thinking ahead....who buys a green wreath base for pink tulle?!?  I do!  Go with a white wreath base if you have a choice.}
I cut the tulle into 3 - 4 inch strips....lots and lots and lots of strips!  The easiest way to do it is to fold the tulle {lengthwise} into fourths, kind of bunch it together, and then cut. 
You'll end up with a strip that is about 3 yards long and 3 - 4 inches wide.
 I'm right handed, so I held onto the tulle with my left thumb and started wrapping it. 
 Then I loosely turned it until it looked like this...it took about 5 wraps.
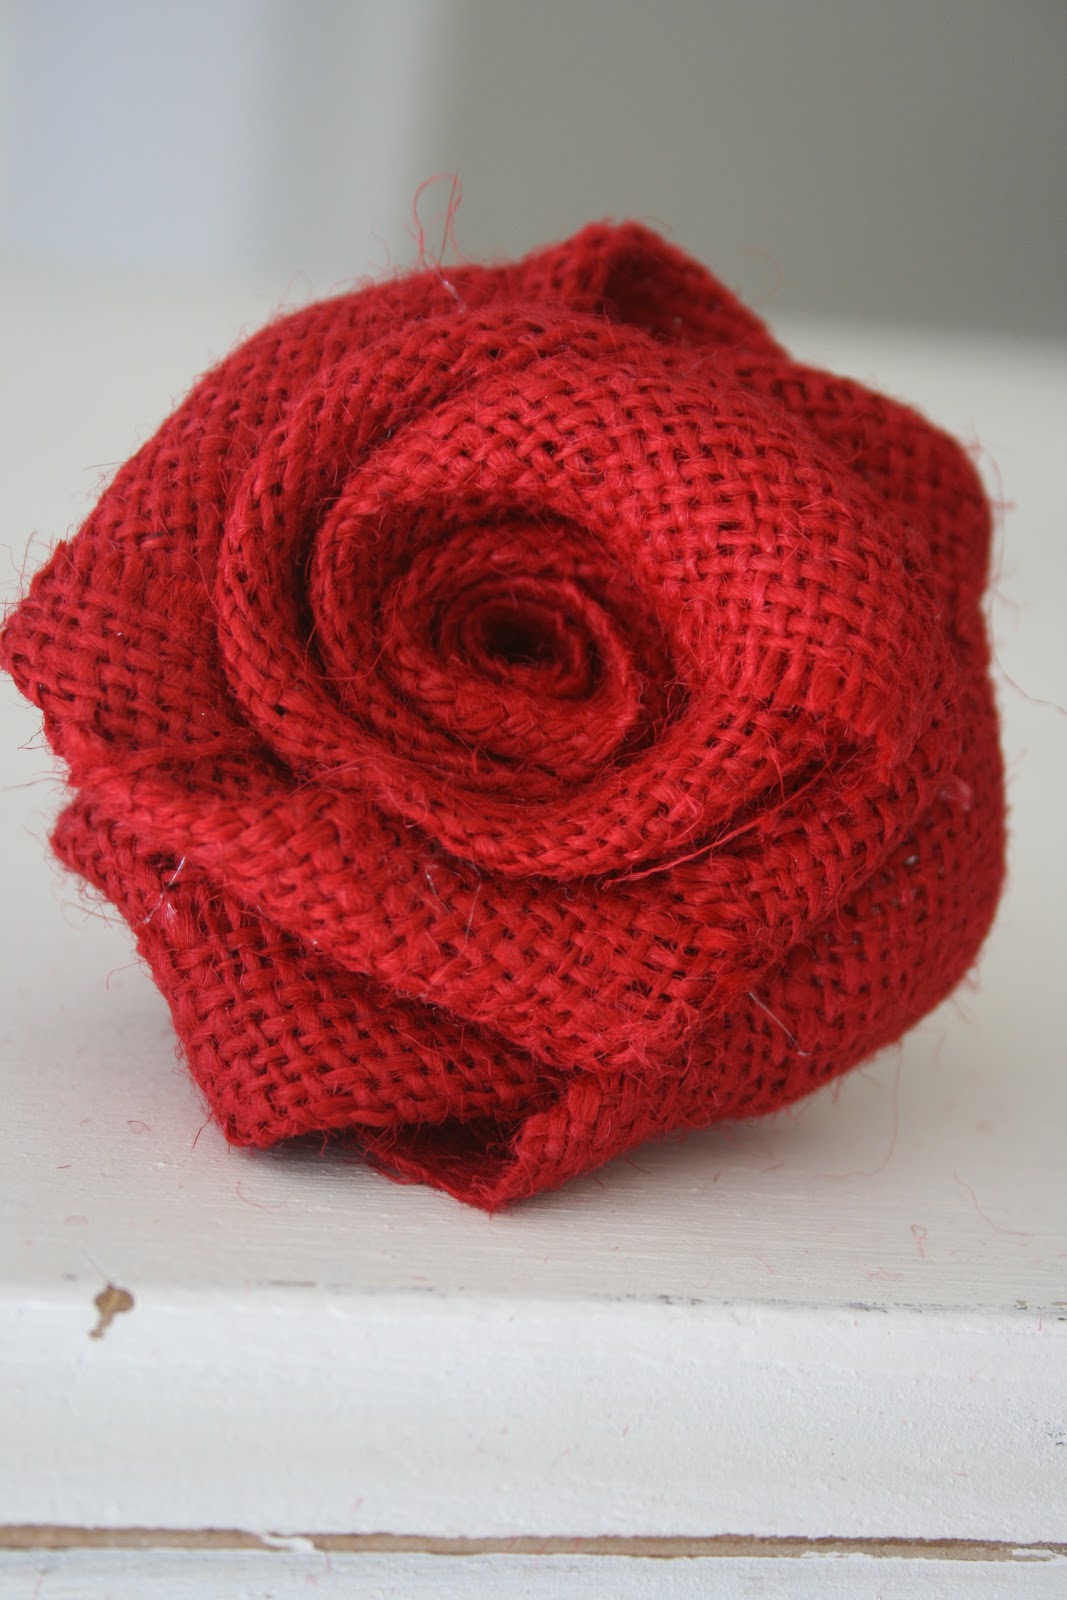
Next, I formed the "bud" of the flower.  I gently unwrapped it from my fingers and held onto it with my thumb.  Then I wrapped the tulle around one side a few times, and then gradually turned it like I was making a ball of tulle...because really that IS all you're going to do! 
See!  I told you it was simple.  :)
The only tricky part is you'll need 100+ flowers, so it makes a perfect tv project. 
Just remember, the tighter you wrap the tulle, the smaller the rose and vise versa.  I like to have a variety of sizes when I do projects like this, so no rules apply!
 When you've wrapped all the tulle, put a corsage pin in the center and you're done!
Then poke the flowers in the wreath base!
{This is when the longer corsage pins come in handy so the roses will stay in nice and snug.} 
This is my favorite part by far...does that make me a craft nerd?
{Umm....don't answer that.}
It's kind of like a puzzle to put them in just the right spots.  :)
Don't forget to pin a fancy little hanger on the back of the wreath and you're done!

Here's a close-up of the finished product!  It was totally worth the effort and is going to look so cute in baby Megan's room!  Some of you commented on the baby shower post, you're thinking of making one of these!  If you do, please send pictures.  I'd love to see your finished product too!

Have fun making the world a cuter place!

~ Cindy Jane 

Sunday, March 25, 2012

Easter Wreath with Embellished Eggs

 Here's my last little craft for my corsage pin embellished eggs. I added them to a cute little ribbon wrapped wreath.  Here's how I did it!

Materials:
10 inch Styrofoam wreath
3 yards ribbon (1 & 1/2 inch width)
pussy willow silk flowers
heather silk flowers
hot glue gun
3 small Styrofoam eggs
corsage pins
glitter paper
Cricut 

Step 1:First I wrapped the wreath base with ribbon and then I pinned a loop of ribbon on the back for it to hang.
Step 2: I layed out the willows and heather around the wreath until I liked it.  Then I hot glued them in place.
Step 3: I made the eggs using Styrofoam eggs, corsage pins, and flowers from my A Walk in My Garden Cricut cartridge.  I used the "blossom" cut at 3/4 inches.  After the eggs were done, I hot glued them to a floral pick and stuck them into the wreath.
Step 4: A third egg wouldn't fit so I cut the top of one off, bedazzled it with flowers and pins, and attached it to the wreath.

Step 5: I added a lot of heather in and around the eggs to give it a nest look and it was finished!
And there you go! A spring wreath with a sparkly Easter touch!
(See, I told you Herbie's modeling days weren't over quite yet!)  :)
Have fun!
~Cindy Jane


P.S. Don't forget to enter our GIVEAWAY!!!!! See all the details HERE


Thursday, February 9, 2012

Tulle Diamond Wreath & Nickel Love!


Marilyn Monroe was right. Diamonds are a girl's best friend....especially around Valentine's Day!  Plus, it's always fun to come up with an excuse to add BLING to an already colorful wreath.  Here's how you can do it too!

Materials:
10 yards fuchsia tulle
10 inch white Styrofoam wreath
1 package Martha Stewart Dimensional Diamond stickers
1 package Jolee's All That Bling stickers (my new favorite thing)
12 inch wooden letters
sandpaper
white primer
silver metallic spray paint
hot glue
$12 in nickels

Tulle rosettes
I made a variety of sizes of roses.  For the larger ones, I cut 2 strips of tulle into 2 inch x 54 inch strips and layered the pieces on top of each other for added thickness.   For smaller roses, I cut 2 inch x 27 inch strips.
Step 1:  With the two pieces of tulle, roll it to form the center of the rose.  Add a dab of hot glue to hold it in place.
Step 2: While pinching the base with your left hand, hold the length side of the tulle and begin twisting and looping it around the center of the rose.  Add glue when the rose begins to form.  Remember to glue low so the dried glue doesn't show.
 Step 3: Keep twisting and gluing with every few twists of the wrist.
 Step 4: When you come to the end of the tulle, add a thin strip of glue.
Finished product!
But it's so much better with the bling!

Putting it all together
Step 1: Wrap the wreath with fuchsia tulle to help hide any white spots when you glue the flowers.

Step 2: Add a loop of tulle to the back of the wreath for hanging.

 Step 3: Place the larger roses on the wreath first.  This helps balance the wreath out and makes the placement of the smaller roses much easier.
 Step 4: Glue all of the roses and then add the diamonds where you think they fit best.

Wooden Letters

Sand 
 Prime and paint
Lay out the nickels to make sure they all fit. 
 Glue them in place.  Don't worry, the guy at the bank said it isn't defacing currency to glue Thomas Jefferson to wooden letters, and they'll pop right off if you ever need a few extra cents for the ice cream man. :)
Hang it and LOVE it!  This would be super cute in a little girl's room all year round. 

Have fun!
~ Cindy Jane

Monday, January 23, 2012

Rhinestone & Tulle Wreath


Love is in the air!  Valentine's Day is almost here and this is the perfect wreath to glitz up your home, especially if red and white aren't in your color scheme.  I was inspired by a wreath I saw here and you can easily make your own too!

What you will need:
10 inch green Styrofoam wreath
10-12 yards of ivory tulle
white or cream fabric to cover the wreath
hot glue gun and glue
2 yards of rhinestones....you might want to get a little extra just in case
The rhinestones I used were regularly priced at $17 per yard but you can get them cheaper online


Step 1: Cover your green Styrofoam wreath in a white or cream material so the green doesn't show through. When I did this wreath, the best thing I could find at 2 a.m. was Aluminum foil tape and it did the trick.


Step 2: Cut the tulle into 2 1/2 x 26 inch strips.


Step 3: Tie the tulle strips in double knots around the wreath.  I doubled up the strips and tied two at a time to give it extra fullness and make it go faster.


Keep tying...and tying...and tying!

Repeat until it is full and fluffy! 


Step 4: Add your glitz! Using hot glue, glue the rhinestones to cover the knots. 


Add the second layer of rhinestones, or a third!  :)


Step 5: Tie a knot in one of the strips of tulle to hang it and now the world is a cuter place all because of you!


Have fun!

~ Cindy Jane


Monday, January 16, 2012

Red Burlap Rose Wreath Tutorial


I love using burlap and wanted to try something different for a Valentine's Day wreath.  My sister gave me the great idea to do this one.  I've attempted to make similar wreaths using crepe paper but I didn't have the patience for them.  This wreath was time consuming, but burlap is SO much easier to use and I really like how it turned out so it was worth it.

What I used:  10 inch Styrofoam wreath
                        8ish yards of red burlap
                        Glue gun and lots of glue sticks
                        A vacuum cleaner many times during this project...burlap is MESSY!
                        Take my advice and cut the burlap strips outside. 


Step One:  Cut out a lot of burlap!  I made small and large roses.  For the smaller roses I cut out strips of burlap that were 13 inches long and 1 & 1/2 inches wide (the width doesn't have to be exact, but it's better to make the strips wider than thinner).  The larger roses were made out of strips that were 26 inches long and 1 & 1/2 inches wide.

How to Cut Burlap in a Straight Line

 Measure the width you want to cut out and use a safety pin to pull out a bit of string at that width.


Pull the string out slowly so it doesn't break.  If it does, no worries, just find the string and keep going.


 Now you've got a nice straight line to cut.  :)

Step Two:  Make lots and lots of burlap roses. I stopped counting at about 120.  This is definitely a project to do in front of a TV or with friends.


How to Make Burlap Roses


Roll the burlap three or four times to make the center of the rose.


Glue at the bottom of the petal that is beginning to form.  Make sure you glue low so the dried glue isn't seen.  Nobody likes looking at a sloppy rose....or 100 sloppy roses for that matter.


As you hold the base with your left hand (if you're right-handed), continue to wrap the burlap around the center of the rose with your right hand while twisting it towards you.  This will give it a full look and keep it together. 


Continue to glue the burlap after every few wraps and twists of your wrist.

At the end of the strip, put a generous amount of glue on the remaining flap and press it down with scissor sheers until it is dry.

Now repeat 100+ times.  :)  The smaller ones took me about 2 minutes each and the large ones about 5 minutes.  It's time consuming, but a great de-stresser.   

Step Three:  Glue the roses onto your Styrofoam wreath.  I used hot glue and it was pretty fast.  There will be a "stem" at the end of the roses that you can trim down to help the roses fit into place better on the wreath. 


I placed the large roses in and then placed the smaller ones to fill in holes.  There were still some white spots showing through so I cut dime sized pieces of burlap and glued them in the gaps so it looked really clean. 


There's the finished product.  I think it definitely helps make the world a cuter place.  :)


One More Wreath
I had some extra roses left over and an extra burlap wreath from my last post.  I added them together and this is what I came up with.