
As promised- Here is the tutorial for the headband from the last post. It is not as hard as it looks! And I am going to list all my favorite places for supplies! These make fantastic baby shower gifts, and are very addicting!
******If you are not the crafty type- this set (Headband and Necklace) has been donated to an auction benefitting the family of Amber Roussel, a mother who lost her life last week in a tragic car accident. You can view all of the items up for bid here. This necklace and Headband are here.
Our hearts go out to this family, and anyone who has experienced a loss such as this! Truly heartbreaking!******
If you want something similar to this, feel free to message me at Little Black Goose.
Okay PJ Crafters- HERE WE GO!

Supplies:
*6"x18" Strip of synthetic fabric of your choice (I am using fabric from Joann's Project Runway collection from last spring- but any will do- as long as it melts when exposed to heat)
*French Netting- Joann's (Usually found with the bridal trims)
*Ribbon- Hobby Lobby has a great selection! Including velvet ribbons, which I love!
*Rhinestone embellishments- Simply Sassy Source One of the best places I have found for these. Huge selection and very reasonable prices!
*Feathers- most craft stores. Mine is a piece of a feather boa.
*Fold Over Elastic- Bitsybands.com
*Pearls- I think these were from Ross, but any craft store carries these little embellishments.
*Tulle- Hobby Lobby
*Scrap of felt
*Glue Gun

Step 1
Cut your strip of fabric into thirds so that you have three 6x6 inch squares. Round the corners a bit so that they are somewhat circular. THIS DOES NOT NEED TO BE PERFECT! A little variation adds to the flowers character.
Next, cut slits in the fabric towards the center so that you have "petals".


Step 2:
CAREFULLY run the edges of the flower over a flame to melt them and give the effect of "petals". This will also seal them so that they won't fray. Be careful not to touch the parts that have melted. They take a few seconds to cool, and can be extremely hot!

Stack your petals like this:
I scrunched the top petal up a bit for texture.

I also added some tulle between the middle and bottom layer to give it some body.

Carefully glue the layers together with your glue gun.

Step 3:
Cut a piece of the feather boa and fold it in half. glue your flower onto the boa. Use plenty of glue, and be careful not to burn yourself!

I had some glittery netting in my stash, so I cut some strips for embellishment, but this is optional and could be done with ribbon or whatever you like. I folded my strips in half and glued them to the back of the flower.

I also tucked another little piece of netting between the flower and the feathers.

Step 4:
The Velvet Bow.
Cut a 7", 5 1/2" and two 6" pieces of ribbon. Cut the 6" pieces into a "v" on the end and run them over a flame to heat seal them so they don't fray.

Fold the other two pieces in half and secure the ends with glue.
Stack them and glue them together.

Cut the other pieces in half and glue them to the under side of your bow.


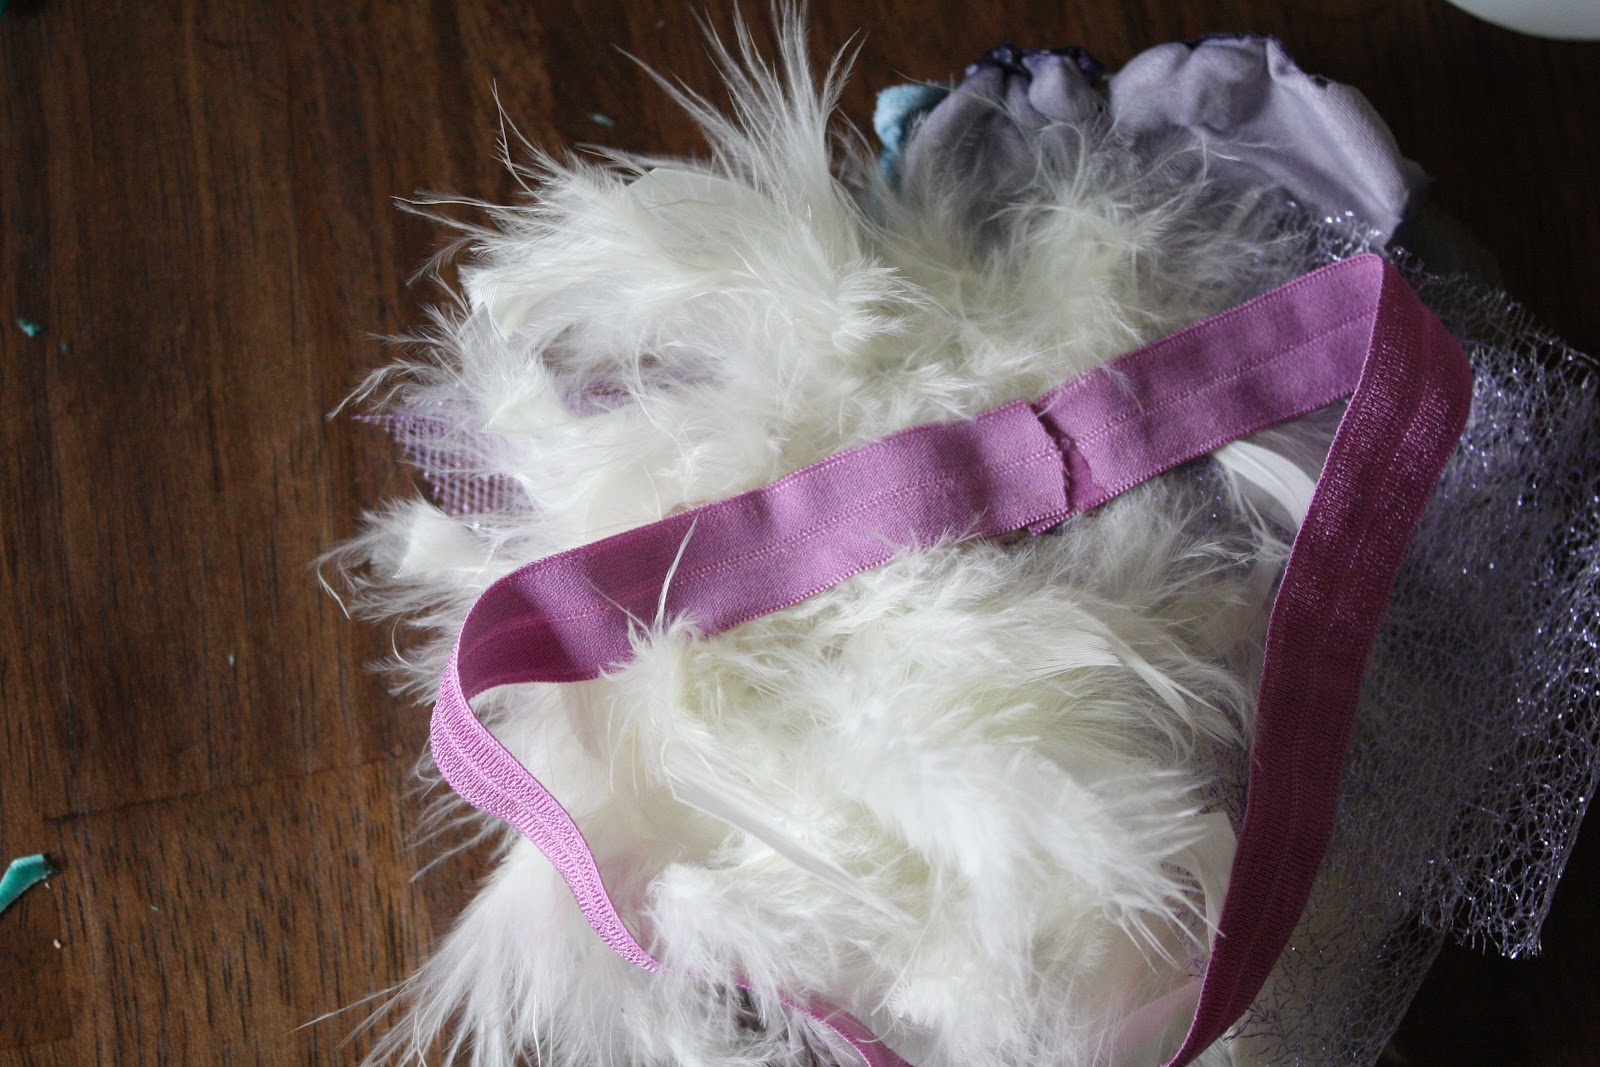
Attach your fold over elastic headband to the back of the flower and secure with glue.

You can fancy up the front any way you like. You can do a big rhinestone center, or a cluster of pearls. Both very simple pretty options. I chose to get a piece of French Netting and tie the center with some sparkly glitter ribbon. I glued that down and then added a rhinestone embellishment, clusters of pearls, and a little bow.

Glue your velvet bow (topped in the center with another rhinestone embellishment) next to the flower, and cover the back with a piece of felt to give it a finished look and add strength.
Trim anything that looks like it needs trimming, and viola! You are finished!!!!

If you try this craft, we would LOVE to see your creations! Please share a photo on our Facebook Page! Isn't it fun to inspire each other?
Happy Crafting!!!
XO~ Laura

that would have been so adorable on my daughters when they were little, unfortunately they are too old for those cute headbands - but love looking at them. Hope you are having a fun Passion parade weekend!
ReplyDeleteDarling!!!
ReplyDeleteThank you do much, ladies! These are so much fun to make! And they make great gifts. If I didn't look silly, I would be tempted to wear one myself!:)
ReplyDeleteI love it. So daring and the little cutie wearing it. Thanks for sharing at "I Gotta Try That" Have a great day.
ReplyDeleteMarcie
So adorable! The colours you chose are beautiful together and I love all those textures in one piece. So awesome! Thanks so much for sharing at Etcetorize this week~
ReplyDeletegreat job with it - looks so cute on her!
ReplyDeleteThank you so much! Just love being part of such a fun community of creative people! We enjoy all of your blogs so much, and appreciate you stopping by! <3
ReplyDeleteGorgeous headband and such cute photos!
ReplyDeleteThanks for linking to a Round Tuit!
Hope you have a fabulous week!
Jill @ Creating my way to Success
http://www.jembellish.blogspot.com/
It is painful to lose a mother. My heart and sympathy goes to her love ones.
ReplyDeleteThis is an awesome tutorial. This hair piece is so dreamy especially modeled by such an adorable baby!
Will be featuring this at Passion Parade Friday! Don't forget to link up your latest creations!
xo
Myric
Absolutely gorgeous headband and a stunningly beautiful model :) Thought the flower arrangement would also look stunning as a Mother of the Bride/Bridesmaid fascinator... oh my, the images in my head right now :) Thank you for sharing xx
ReplyDeleteYou have some honest ideas here. I done a research on the issue and discovered most peoples will agree with your blog.
ReplyDeleteVintage Headband Boutique