Tuesday, February 28, 2012

Easter Egg Giveaway!

We are so excited to offer our first giveaway! 
Here's how you can enter to win one of these fancy Easter Eggs.
(A $25 value!) 

1. Follow the Pajama Crafters blog. 
If you are already following, then congratulations, you are one step closer to winning!  All you have to do is post a comment on this post telling us which egg is your favorite.  We will mail the egg of the winner's choice to them.
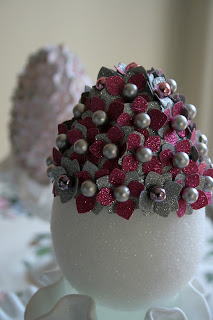
(Left: Petal Pink  Right: Glitter  Bottom: Vintage)

You can receive additional entries for the following:
1. Follow us on Facebook.
2. Share our Pajama Crafters Facebook page OR this blog post with your Facebook friends.
3. Follow us on Pinterest.
4. Comment on previous posts.

Let us know what you have done for the additional entries in this post's comment section.  Please make a separate comment for each of your entries. Previous comments/shares/likes/follows are eligible as entries.
The winner will be randomly selected on Monday, March 19th! 


Fine Print: Winner must have a U.S. mailing address to receive their egg.

Have fun!

~Cindy Jane 

Thursday, February 23, 2012

Faberge Inspired Easter Eggs

These little beauties were inspired by one of my first Pinterest "pins" and they've been on my to do list for over 6 months. I thought I would only make one or two, but these innocent little eggs have taken on a life of their own and inspired an avalanche of other projects.  Here's a sneak peak of what I've done so far, and there's more to come!

Materials:
Large Styrofoam egg (3 7/8 x 5 7/8)
4 pieces cardstock (12x12)
Pins or corsage pins (about 125)
Flower paper punch/die cut machine
First: Cut out lots and lots and lots of paper flowers....I had carpel tunnel syndrome symptoms by the time I was done with this thick glitter paper.  My wrists and  I suggest using Martha Stewart glitter paper.  It's much thinner and isn't as painful if you're punching it out by hand.
Next: Overlap the flowers and pin to the egg.
My cute mom gave me these shiny pins, but there weren't enough, so....
I bought some cheap ones and spray painted them.
These pins are short so I added some clear adhesive glue to each one before I poked them in.
Finished product!
Its ready for its close up!

I used corsage pins on the second one and they went in much easier.
I added just a touch of glittered petals to this one.
I couldn't stop at two so I had to make just one more.
I love the patterned blossom on this one.
Click here for a chance to win one of these eggs!

Have fun! Now go make the world a cuter place!
~ Cindy Jane


Monday, February 13, 2012

No Sew Burlap Ruffle Banner


I know Valentine's Day is only a few hours away, but I'm a last minute kind of girl and I have to share this weekend's project!  This banner was really easy to make and the style would be perfect for Valentine's Day or a baby or wedding shower.  Plus, for my fellow sewing-phobic friends out there, the only sewing involved was a few stitches with a needle and thread.  Plus, I used burlap and scrapbook paper from previous projects, so it was free!  (That never happens to me!)  Here's how I did it.

Materials:
Burlap
Cardstock
Spray adhesive
Needle
Hot glue
Cricut for the letters and the inner paper triangles

Step 1:  I had 2 yards of burlap, and I cut out 3 strips that were 2 inches wide.  Since you'll be ruffling it, 6 yards makes only 6 feet of ruffle.  Click here (and scroll down) to see my tips on cutting burlap in a straight line.  (It's a lifesaver!)
Step 2:  Take one of the center threads and pull it.  Your burlap will start to ruffle. 
When you get about halfway through, pull on a thread at the opposite end and start the ruffle from the other side. Repeat on your other strips. 
Step 3: I cut around a 6 inch triangle I had cut out on my Cricut, leaving some extra room around the edges.  I wasn't worried about being precise on this part.  (I used the George & Basic Shapes cartridge and the triangle is Triangle 2.)

Step 4: Cut out 1 inch strips for the side ruffle.  (I suggest cutting the side ruffles in lengths no longer than 1 foot to help keep the side ruffle perky.)  Follow the same steps as above to make these shorter ruffles.
Step 5: Hot glue the ruffles around the edges of the triangle.
Step 6: Add the paper triangles and letters inside the burlap triangles.  They should fit snugly in the center.  I used Elmer's Glue Spray Adhesive to secure them and it worked perfectly.  The triangles are 5 & 1/4 inches using the same Cricut cartridge and font as above.  I used the Songbird Cricut cartridge in 3 inch letters for the word.
Step 7: Sew the length of the banner together.  I used a string of burlap for my thread and you can't tell it's pieced together.

Step 8: Center your letters and stitch them together!  I also stitched each end of the burlap shut so it didn't come undone.
I think I might be more excited to pull this out for a wedding shower than Valentine's Day!  It would be so cute to make a personalized one for the bride and groom too!  Now I just need one of my friends to get engaged.  : )  Let us know your creative ideas for one of these fun banners!  They definitely make the world a cuter place!

Have fun & Happy Valentine's Day!

~Cindy Jane

Thursday, February 9, 2012

Tulle Diamond Wreath & Nickel Love!


Marilyn Monroe was right. Diamonds are a girl's best friend....especially around Valentine's Day!  Plus, it's always fun to come up with an excuse to add BLING to an already colorful wreath.  Here's how you can do it too!

Materials:
10 yards fuchsia tulle
10 inch white Styrofoam wreath
1 package Martha Stewart Dimensional Diamond stickers
1 package Jolee's All That Bling stickers (my new favorite thing)
12 inch wooden letters
sandpaper
white primer
silver metallic spray paint
hot glue
$12 in nickels

Tulle rosettes
I made a variety of sizes of roses.  For the larger ones, I cut 2 strips of tulle into 2 inch x 54 inch strips and layered the pieces on top of each other for added thickness.   For smaller roses, I cut 2 inch x 27 inch strips.
Step 1:  With the two pieces of tulle, roll it to form the center of the rose.  Add a dab of hot glue to hold it in place.
Step 2: While pinching the base with your left hand, hold the length side of the tulle and begin twisting and looping it around the center of the rose.  Add glue when the rose begins to form.  Remember to glue low so the dried glue doesn't show.
 Step 3: Keep twisting and gluing with every few twists of the wrist.
 Step 4: When you come to the end of the tulle, add a thin strip of glue.
Finished product!
But it's so much better with the bling!

Putting it all together
Step 1: Wrap the wreath with fuchsia tulle to help hide any white spots when you glue the flowers.

Step 2: Add a loop of tulle to the back of the wreath for hanging.

 Step 3: Place the larger roses on the wreath first.  This helps balance the wreath out and makes the placement of the smaller roses much easier.
 Step 4: Glue all of the roses and then add the diamonds where you think they fit best.

Wooden Letters

Sand 
 Prime and paint
Lay out the nickels to make sure they all fit. 
 Glue them in place.  Don't worry, the guy at the bank said it isn't defacing currency to glue Thomas Jefferson to wooden letters, and they'll pop right off if you ever need a few extra cents for the ice cream man. :)
Hang it and LOVE it!  This would be super cute in a little girl's room all year round. 

Have fun!
~ Cindy Jane