Showing posts with label Burlap. Show all posts

Monday, April 9, 2012

Weekend Pajama Party: Burlap Rose Lampshade

I have such a love/hate relationship with burlap!
I LOVE the look but HATE the mess!
I decided to "forgive-and-forget" for this lamp update and love, love, LOVE the way it all came together. I've had a set of lamps for about 7 years that I haven't used since I moved into my new house a few years ago and revamped my style. Anyway, I got ambitious on my 4 day weekend {the perks of being a teacher} and this is how it came together.

What I Used:
3 yards of natural colored burlap
hot glue/gun
repurposed lamp and shade
Krylon spray paint in Blue Ocean Breeze

Here's the "before" of the lamp. 
It's not too shabby, just a little too traditional for my house these days.
 First, I covered the cord and lamp structure with tin foil and spray painted it one of my favorite accent colors...Blue Ocean Breeze.
That was the easy part! 

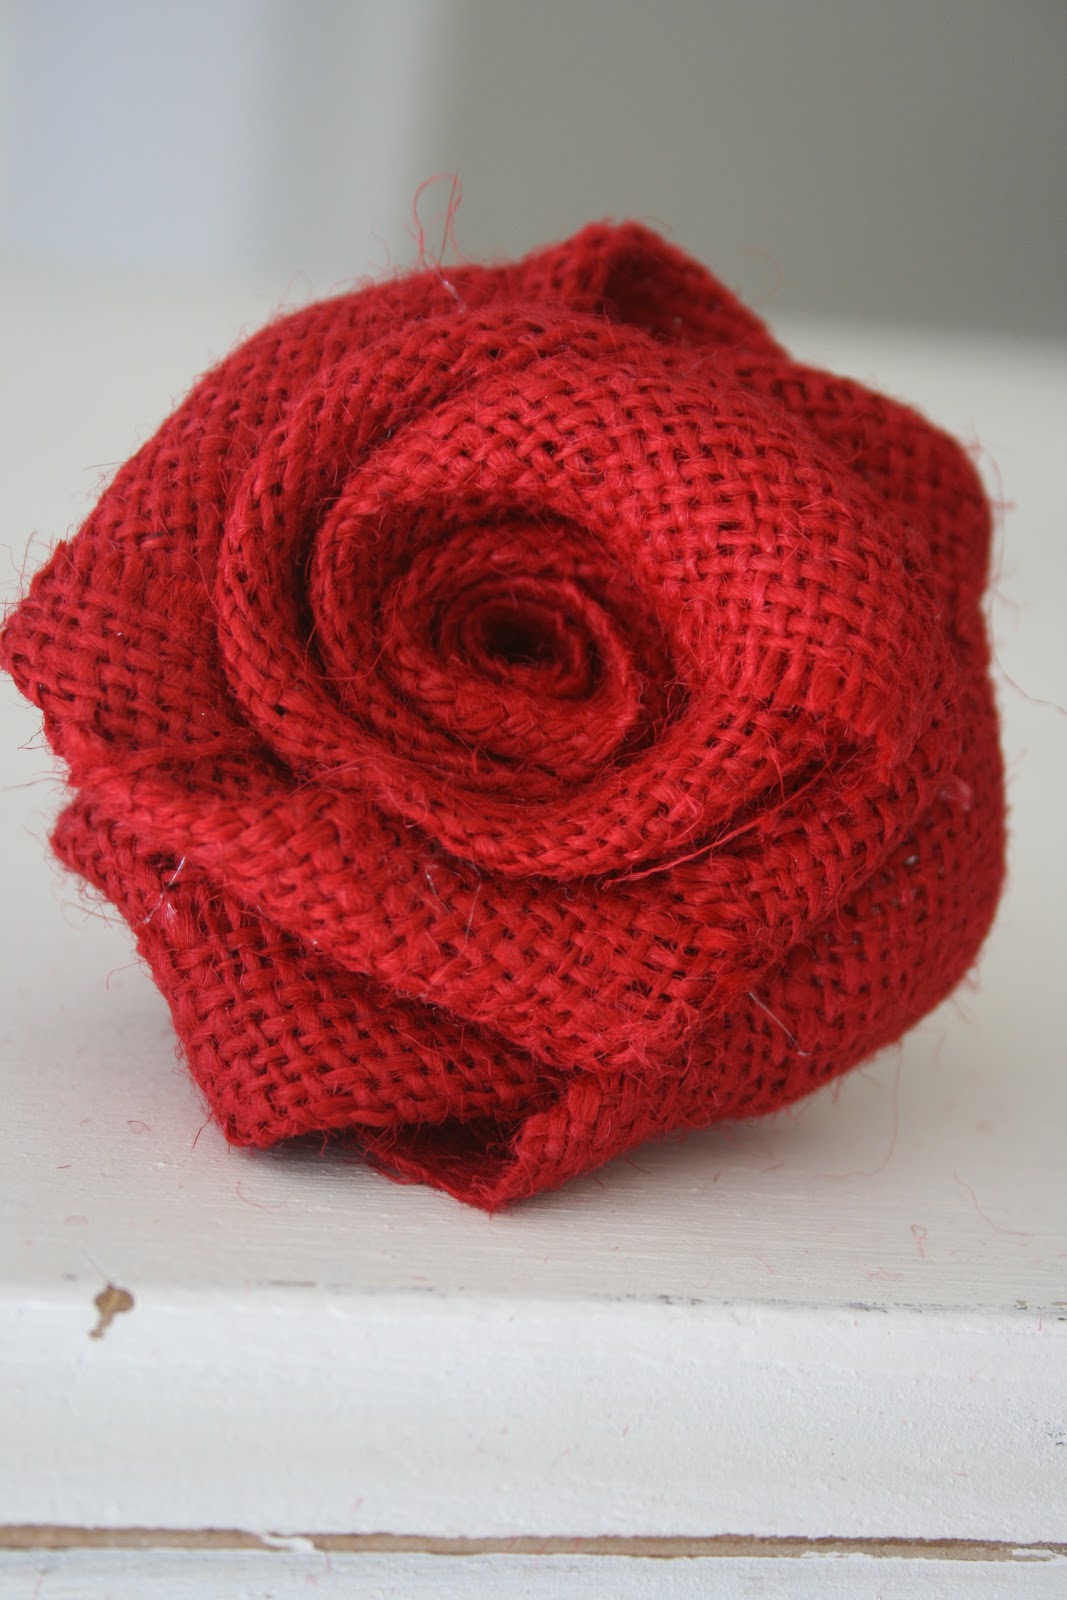
Then, onto the burlap roses. 
I started by cutting 46-inch strips of burlap--this was the bolt width. 
{Click HERE for a tip on cutting burlap in straight lines.}
The strips varied in widths from 1 & 3/4 inches to about 2 & 1/2 inches.  I was able to make 3 roses out of each long strip of burlap. 
{Click HERE for directions on how to make the burlap roses.}

My lamp shade is about 11 inches tall and has a 36 inch diameter at its widest spot.  I made about 80 roses to cover it. 
If you want to make fewer roses {I recommend this!} I suggest cutting wider strips of burlap and making larger roses.
Gluing the roses on is the best part!
You'll need to cut off the "stems" of the roses so they will glue flat.
Another suggestion is to glue the roses around the top and bottom edges of the lampshade first. 
Then glue the remaining roses in.
I was so happy giddy when I glued in the last roses and put the lamp together. 
This project was totally worth the time and mess.  Plus, since I already had the lamp and spray paint, this project cost me less than 10 bucks! 
Even if you don't tackle burlap roses, I hope this project inspires you to repurpose something you love, but haven't used lately, to make your world a cuter place too!

Have fun!
~Cindy Jane

P.S.  Don't forget to "LIKE" us on Facebook! 
When we reach 100 "LIKES" we'll give away a
SUPER CUTE chunky necklace.
Click HERE for the details!

Monday, February 13, 2012

No Sew Burlap Ruffle Banner


I know Valentine's Day is only a few hours away, but I'm a last minute kind of girl and I have to share this weekend's project!  This banner was really easy to make and the style would be perfect for Valentine's Day or a baby or wedding shower.  Plus, for my fellow sewing-phobic friends out there, the only sewing involved was a few stitches with a needle and thread.  Plus, I used burlap and scrapbook paper from previous projects, so it was free!  (That never happens to me!)  Here's how I did it.

Materials:
Burlap
Cardstock
Spray adhesive
Needle
Hot glue
Cricut for the letters and the inner paper triangles

Step 1:  I had 2 yards of burlap, and I cut out 3 strips that were 2 inches wide.  Since you'll be ruffling it, 6 yards makes only 6 feet of ruffle.  Click here (and scroll down) to see my tips on cutting burlap in a straight line.  (It's a lifesaver!)
Step 2:  Take one of the center threads and pull it.  Your burlap will start to ruffle. 
When you get about halfway through, pull on a thread at the opposite end and start the ruffle from the other side. Repeat on your other strips. 
Step 3: I cut around a 6 inch triangle I had cut out on my Cricut, leaving some extra room around the edges.  I wasn't worried about being precise on this part.  (I used the George & Basic Shapes cartridge and the triangle is Triangle 2.)

Step 4: Cut out 1 inch strips for the side ruffle.  (I suggest cutting the side ruffles in lengths no longer than 1 foot to help keep the side ruffle perky.)  Follow the same steps as above to make these shorter ruffles.
Step 5: Hot glue the ruffles around the edges of the triangle.
Step 6: Add the paper triangles and letters inside the burlap triangles.  They should fit snugly in the center.  I used Elmer's Glue Spray Adhesive to secure them and it worked perfectly.  The triangles are 5 & 1/4 inches using the same Cricut cartridge and font as above.  I used the Songbird Cricut cartridge in 3 inch letters for the word.
Step 7: Sew the length of the banner together.  I used a string of burlap for my thread and you can't tell it's pieced together.

Step 8: Center your letters and stitch them together!  I also stitched each end of the burlap shut so it didn't come undone.
I think I might be more excited to pull this out for a wedding shower than Valentine's Day!  It would be so cute to make a personalized one for the bride and groom too!  Now I just need one of my friends to get engaged.  : )  Let us know your creative ideas for one of these fun banners!  They definitely make the world a cuter place!

Have fun & Happy Valentine's Day!

~Cindy Jane

Monday, January 16, 2012

Red Burlap Rose Wreath Tutorial


I love using burlap and wanted to try something different for a Valentine's Day wreath.  My sister gave me the great idea to do this one.  I've attempted to make similar wreaths using crepe paper but I didn't have the patience for them.  This wreath was time consuming, but burlap is SO much easier to use and I really like how it turned out so it was worth it.

What I used:  10 inch Styrofoam wreath
                        8ish yards of red burlap
                        Glue gun and lots of glue sticks
                        A vacuum cleaner many times during this project...burlap is MESSY!
                        Take my advice and cut the burlap strips outside. 


Step One:  Cut out a lot of burlap!  I made small and large roses.  For the smaller roses I cut out strips of burlap that were 13 inches long and 1 & 1/2 inches wide (the width doesn't have to be exact, but it's better to make the strips wider than thinner).  The larger roses were made out of strips that were 26 inches long and 1 & 1/2 inches wide.

How to Cut Burlap in a Straight Line

 Measure the width you want to cut out and use a safety pin to pull out a bit of string at that width.


Pull the string out slowly so it doesn't break.  If it does, no worries, just find the string and keep going.


 Now you've got a nice straight line to cut.  :)

Step Two:  Make lots and lots of burlap roses. I stopped counting at about 120.  This is definitely a project to do in front of a TV or with friends.


How to Make Burlap Roses


Roll the burlap three or four times to make the center of the rose.


Glue at the bottom of the petal that is beginning to form.  Make sure you glue low so the dried glue isn't seen.  Nobody likes looking at a sloppy rose....or 100 sloppy roses for that matter.


As you hold the base with your left hand (if you're right-handed), continue to wrap the burlap around the center of the rose with your right hand while twisting it towards you.  This will give it a full look and keep it together. 


Continue to glue the burlap after every few wraps and twists of your wrist.

At the end of the strip, put a generous amount of glue on the remaining flap and press it down with scissor sheers until it is dry.

Now repeat 100+ times.  :)  The smaller ones took me about 2 minutes each and the large ones about 5 minutes.  It's time consuming, but a great de-stresser.   

Step Three:  Glue the roses onto your Styrofoam wreath.  I used hot glue and it was pretty fast.  There will be a "stem" at the end of the roses that you can trim down to help the roses fit into place better on the wreath. 


I placed the large roses in and then placed the smaller ones to fill in holes.  There were still some white spots showing through so I cut dime sized pieces of burlap and glued them in the gaps so it looked really clean. 


There's the finished product.  I think it definitely helps make the world a cuter place.  :)


One More Wreath
I had some extra roses left over and an extra burlap wreath from my last post.  I added them together and this is what I came up with.

Tuesday, January 3, 2012

Burlap Wreath

I saw the cutest burlap wreath on Pinterest a few months ago and loved it, but the link didn't come with any instructions. I love a good challenge, so I did some good detective work at the craft store and figured it out.

I bought this wire wreath form at Michael's for about $3.00, which is great since you're getting three wreath forms for the price of one after you take it apart.


I used some tools to take it apart so I could use one of the sections. 


Here it is after I took it apart.

Next I bent back one end to make a hook so the burlap wouldn't fall out when I put it on the wreath. 

On the other side of the circle, I measured 3 inches back and marked it with a piece of tape so the layering of the burlap would be consistent.

Meanwhile, over at the ironing board, I ironed the burlap and then cut it into 4 inch strips.  I used about 4 yards of  burlap that I bought at Joann's for $3.00 a yard.  Just a warning, the burlap is pretty messy.  It sheds all over the place so expect to find little bits floating around for a while.

Then I poked through one side of the burlap, used my line of tape to measure the three inches and then poked the wire frame throught the next section. The next time I put the burlap through, I twisted the burlap half a twist and then poked it through the wire. That is the most important step that gives the burlap fullness.  If you don't do it, your wreath will be floppy and frumpy.


When I felt like the wreath was getting really full, I bent the other end of the wire frame back, so both ends could hook into each other. If you really want to make it sturdy, you can wire the ends shut, but it should be fine.
Then I added a bow and, ta-da, it was finished.  These are super easy to make and cost less than $15.00 to make.  It would be such a fun and unique present to give.  My next project is to make a red one for Valentine's Day.